Wednesday, February 22, 2012

To prime or not to prime....

Primer... hmmm.  I've always been skeptical about face primers.  Do we really need them?  Do they really do what they say they do?  Over the years I've randomly tried different primers underneath my foundation.  Smashbox primer, Makeup Forever, Givenchy Mister Mat.. the list goes on.  I HATED all of them.  They left my face feeling slippery and feeling yucky.  I pretty much gave up with the whole must "prime" before foundation theory.  A face primer is used to even out the skin texture.  It acts as a barrier between the skin and the foundation.  It gives the makeup something to grab onto.  It is supposed to have mattifying properties to take away shine and reduce pore size.  Since I hadn't found a primer I liked or that did what it was supposed to do I gave up on implementing it into my makeup routine.  I felt that as long as I moisturized before I was good.  That is until I came across this lil gem! 
 It's the mineral veil face primer by Hourglass Cosmetics. 


I was shopping at Sephora and like always, I like to play with products that I've never seen or used. I noticed the mineral veil and intriguingly put some on the back of my hand and instantly fell in love!!  It left the most even, satiny finish, almost like I had foundation on.   I find that after I apply the primer I usually only need a brush of powder and blush and I'm on my way!  It has made my makeup stay on all day and leaves my skin looking flawless!  
  

* SPF 15 (PLUS PLUS PLUS!!!!)
* Minimizes shine
* Minimizes appearance of pores and fine lines
* Preps skin for makeup application while extending It's durability
* FREE of parabens, oils, fragrances, gluten, sulfate. 
* Water resistant 


I hope this helps those of you who have searched far and wide for a decent primer and for those who have given up on finding one.  If you have a primer you LOVE please leave comments below.  I would love to hear about the ones you've tried, loved, and hated.  
Stay tuned for more of my new finds!!
Love you my makeupnistas!!  

Check out my website www.ashleyanselmo.com & my Facebook page Makeup by Ashley Anselmo

Wednesday, February 15, 2012

Adele's Grammy makeup tutorial

Adele... Beautiful voice, Beautiful face....


She is my FAVORITE artist hands down.  When I heard she was going to undergo surgery to remove a polyp on her vocal cord I was devastated.  I couldn't imagine Adele not making any more amazing albums.  When I heard she was performing at the Grammy's I was super ecstatic. When I saw her on the red carpet I was blown away.  What a classic beauty.  So graceful and elegant.  When I thought It couldn't get any better she took the stage and I literally had tears in my eyes during her performance.  No fireworks, no rave music, no lip syncing, no crazy dance moves.... just pure, perfect, and flawless talent.  Since I was so enamored by her look and makeup Sunday night, I decided to write a blog on It. 

I obviously did not do her makeup for the big event (maybe one day ;) but It is pretty simple how she acquired the look or how I would mimic the look with my products.

So first things first.. She has a very fair complexion so she use a beautiful matte foundation.  I'd recommend the Makeup Forever Mat Velvet foundation.  It's a full coverage foundation that is for oil prone skin and it's also water resistant.  It just leaves the most flawless coverage.  


Once you've got your foundation on your obviously going to set it with a finishing powder.  Since she was in front of a lot of flashing cameras that night I would assume she used a High Definition powder.  I like using Makeup Forever High Definition finishing powder.  Don't let the white powder fool you.  It goes on translucent and does not leave your face white.  I use it on my clients when they make TV appearances and also on my brides for pictures.  

It looks as though Adele used a contouring product of some sort.  She didn't over do it, she has amazing cheekbones but some contouring is always a must.  If I were doing this look I'd use my M.A.C blush powder in Clove Pro matte.  It's a peachy bronzy blush that works great for fair complexion's for contouring. 


And your just going to want to take a contouring brush and gently buff right under your cheekbones.  If you have a wide or long forehead, go ahead and contour around your temples extending upwards along the hair line making sure to buff into the hair line.  Also, if you want to define your jawline, contour right under your jawline giving the illusion of a more prominent jaw.  Here's a picture of all the proper areas that you can contour. Courtesy of Kevyn Aucoin. 


Obviously blending is a MAJOR factor when contouring.  Make sure you buff and buff so you leave no harsh lines.  This picture is merely to show you the areas of dark(where you want certain features to recede and the lighter areas where you want to it to seem more prominent)  I'll do another blog on contouring and highlighting soon.  There is a lot of great techniques that I'll show you.  It's amazing what it can do.  

Now we can move on to her amazing eyes that dazzled that night.  I love how she chose a very neutral lid since she really played up the eye liner and lashes!  I would start off with a M.A.C paint pot in Painterly.  Then I would apply M.A.C eyeshadow in Naked Lunch(I know, weird name) all over the lid


Then I would apply M.A.C shadow in Free To Be just in the crease of the eye very VERY softly. 


Now we can move onto the eyeliner part of the look.  She obviously used a liquid liner.  She made a thick line on the top lash line which made such a classic statement.  It was PERFECTION!  It made her green eyes pop and looked so glamorous.  You can use the Loreal Lineur liquid liner that I spoke about in the Eyeliner blog or any liquid liner that you love.  On the bottom lash line I would use a gel liner (M.A.C. Blacktrak) and get it as close to the lash line as possible.  Almost smudge it into the actual bottom lashes.  
Don't forget to fill those brows in also.  Get a trained esthetician to groom your eyebrows.  It's so important to maintain your eyebrows.  They frame the face and can totally complete your look.  Fuller eyebrows are making a comeback ladies so let them GROW!!  Just keep them groomed!  Fill them in with a powder that's close to the color of your hair.   


FALSE LASHES!!!!... This look was made fabulous by these dramatic lashes.  Just so beautiful.  I like to use the M.A.C. False lashes #36 in very black.


And last but CERTAINLY not least.. those fabulous red lips!!  I think she pulled them off fantastically!!  She looks like an old Hollywood movie star like Elizabeth Taylor.  If I were doing this look I would probably choose M.A.C. lipstick in Russian Red.  It looks great on every skin tone.  It's a universal red!  


I hope you try this look.  It's so simple but yet makes a statement.  If you do this look send me a picture!  I'd love to see your masterpiece!  Stay tuned for more blogs coming up.  I'll be talking about this coming Spring and the beautiful colors that are popping up everywhere.  Be sure to check out my Facebook page Makeup By Ashley Anselmo or my website www.ashleyanselmo.com.  

See you soon  my Makeupnistas!!  


Wednesday, February 8, 2012

DRUG STORE HAUL..


I don't know about you but I LOVE drugstores.  Especially wandering up and down the makeup aisle.  Some of my FAV's are straight from the drugstore.  I went on a quick drugstore haul and here are some of my fav finds!! 


First I'll start with a product that goes with another product I talked about in an earlier post.  It's the Instant Age Rewind under eye concealer.(around $8 dollars)


  I LOVE LOVE this concealer.  I only use it under my eyes though.  I don't know, there's something about the formula that smooths out the lines and it just looks nice and smooth. It also is good for dark circles (i don't have those yet but some out there may love that part of it)


Another favorite find is the new 24 hour tattoo paint pots by Maybelline ($6.99).  I've been reading and reading about them and finally caved in a bought some.  LOVE LOVE LOVE!!  I mean, you can almost say their comparable to M.A.C paint pots!  Their extremely pigmented and last ALL day.  I also noticed that they don't crease which I really like. I was so impressed with this find:)

 I started out with the colors #45 Bold Gold and #35 Tough as Taupe 


This is Bold Gold #45.  It's the perfect gold with just the right amount of shimmer.  It is so pretty when using it on the inside corner of eye and lid! 


The color above is called Tough as Taupe #35.  It's like the perfect dark satin taupe color.  If you layer it turns into a beautiful grey color. 


I can't wait to try the other colors soon!  They have some pretty vibrant ones also.


Another great product that I found is a Lipstick by Revlon.  Its called Nude Attitude and the number is #001

After a swipe of some clear/slightly pink gloss, I'm loving this look.  It's also a great to pair with a dark smokey eye.  It almost reminds me of my M.A.C. lipstick called Angel.  But for one third the price.  


My next find came from my sister Emily.  I needed to borrow some makeup remover because I ran out of my Clinique.  I've been using Clinique makeup remover for years and It's not cheap.  I asked to use whatever she had and she handed me this.....


I just knew this was going to be a nightmare.... I mean, Rimmel?  I put some on a cotton round and when I tell you my eye makeup came right off!  I LOVE LOVE this stuff.  It has NO oil in it so it doesn't leave a greasy after glow( I hate products that do that)... This product totally surprised me.  I'm addicted to it and use it on myself and during my makeup applications.  I consider this a MUST for every girls makeup removing regimen.  At  $6-7 dollars it is a definite steal!  


And the last product that I want to share is the new lip conditioners Baby Lips by Maybelline!  ($3.99)


Can I just say that I LOVE these?!!  My lips felt AH-MAZING when I applied it.  It has a slight hint of color that is perfection.  They also have two that are clear.  It has an SPF20 which we all know is super important!!  It enhances your natural lip color without it being too bright!  I like to exfoliate my lips with a little sugar and a toothbrush then apply one of these right after.  Feels just like "baby lips"..... seriously, the name says it all! 

Hope you enjoyed reading about my drugstore finds for the week!!   And remember to check out my Facebook page: Makeup by Ashley Anselmo or my website: www.ashleyanselmo.com

See y'all soon my makeupnistas!! 


Thursday, February 2, 2012

Eye Spy... EYEliner :)

This blog is all about EYE LINER!!!!  
Liquid, pencil, gel, powders and don't forget that there are more colors out there other than black and brown.  Get creative, use navy, deep plums, or any other color you choose.  That's the great thing about makeup, you are creating a look that is personalized by YOU.  It is a form of creativity and art so have fun with it!!  

there are so many forms of how to line your eyes.  The purpose of lining the eyes is to add definition and shape to the eye for a more dramatic look.  Most of the time it makes your eye color pop and makes the lashes look fuller and more voluminous.  There are so many ways to use and apply eyeliner and we'll go over a few of my favorite ways and products.  

I'll start with my ABSOLUTE, hands down, staple FOREVER favorite... 
Loreal Lineur Intense liquid liner with the brush tip applicator.  I know, the brush is a difficult tool to master but I've been using it since i was 14.. literally the same product too.  The image on the right is the effect a liquid liner gives.  It's extremely dramatic and definitely makes a statement with your makeup.  For someone who is new to liquid liner and wants to try it i suggest starting with the felt tip applicator that Loreal makes.  It's the same formula just a different applicator.  You can find this at any drugstore for around $8-9 dollars. 


I find that liquid stays on longer and it's less prone to smudge or to run during the day.  It's definitely a difficult task to master but practice, practice, practice and you'll be a pro in no time!!

Your going to want to start with a lid primer.  I use a Paint Pot by M.A.C. called Painterly or Soft Ochre that is around $17.50.  Once the lid is prepped you can begin. For beginners i would start at the outer corner by making small dashes across the lash line like this


Once you have your dots across the lash line, now you can connect the dots with soft and short strokes.  Once you get the hang of it it will become easier for you.  I have used the trick of lining the lash line with a black or smokey gray shadow, then applied the liquid liner.  It's up to you with what works best for you.  Now applying liquid to the bottom can be tricky because of the way our lower lashes curl downward and get in the way.  I personally DO use it on the lower lashes and I'll go over it with a black shadow to soften it up a bit.  Sometimes I just use a shadow on the bottom if I'm not going for a real dramatic look.  

Another similar form of liquid liner is a gel liner.  The gel formula is a thicker consistency.  I LOVE using this on my clients because it gives the effect of a liquid without the harsh line that a liquid creates.  It just gives the prettiest shape to the eye.  My all time FAVORITE that i use is the Fluid line by M.A.C in Blacktrack ($15).
  
It will last you a LONG TIME!  I apply it with my M.A.C. 266 small angled liner brush($19.50).  What i do is dip my brush in the gel pot and just coat both sides of the angled brush with product and slide the excess product off on the side of the pot.  You need to kinda work fast with this product because it tends to dry quickly leaving little room to get the whole line lined.  It's ok to go back over the line to get a more opaque look.  I find it really great for the lower lash line.  The angled brush just slips between the skin and lashes and just goes on so smoothly!
  

Once you get the line and thickness you want, you want to get as close to the lash line with the product.  Try not to leave any gaps between the liner and lash line.  Like the above picture, Just fill in that space with product!  


The next type of liner we'll talk about is the pencil liner.  I'm not a particular fan of a pencil liner.  I feel like it smudges, runs, and doesn't really give a dramatic effect.  If you know me then you know i like a more dramatic look!!  But recently I've been loving the Urban Decay 24/7 glide on liner ($19 at Sephora or Ulta). 

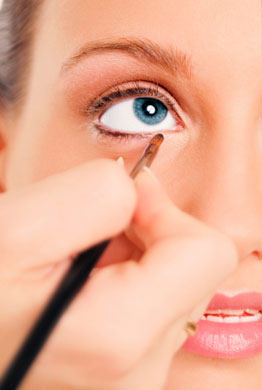
Although it is a pencil is gives a very pigmented and liquid like application.  I find that it doesn't run throughout the day like most pencils do which to me is a plus!!  I also love lining the water line of the eye.  To me it gives a really sultry and dramatic look.  It's hard to find a liner that will stick and stay to the water line and i haven't found a product that works as well as this one!  For those who aren't familiar with the "water line" this is where it is. 


It's the inner rim of your bottom lash line.  Now don't get me wrong, if you choose to do this look don't forget to put your pencil in your clutch for the night because touch ups will be a must simply because that part of your eye gets wet.  I just like this product because it lasts so much longer than any others that I've tried.


The last product that i want to talk about is using a powder as a liner.  You can use it alone or along with any of the above liners.  it gives such a soft smokey effect.  I recently purchased the Urban Decay Naked 2 pallet($50) at Sephora and I'M ECSTATIC!!  You could use most of the dark shades of the pallet as a shadow liner.  Here's what the pallet looks like...


and here's what the swatches look like on the skin...


I mostly use the blackout and busted to line my eyes before i put the liner on to give a soft look.  Or feel free to just use the shadow alone for a more subtle look.  


I suggest using a M.A.C 219 pencil brush($24) to apply a powder to the lash line.  I'm currently obsessed with this pallet and before it's over with i may have to repurchase another one because it will be gone before i know it!!  

I hope you've enjoyed all my little tips on eyeliner.  Please feel free to send me any questions here or on my website www.ashleyanselmo.com and i look forward to seeing y'all next time :)